
This post may contain affiliate links. See our disclosure policy for details.
Save time, money, and space by printing your homeschool curriculum with this simple hack. Learn how to print your own DIY Curriculum Booklet with a full step-by-step tutorial.
For a full list of your secular homeschool curriculum options, see our Secular Homeschool Curriculum Guide.

Printing over 400 pages of curriculum can be a daunting task. If you have more than one child, you can quickly become overrun with binders, spiral TE’s, loose papers, and texts.
Or worse waste time scrolling through multiple files, taking time away from your homeschool day. Not this year! Follow this simple guide about how to create a small, manageable booklet to hold all of your curriculum.


These photos show roughly 300 pages printed and disc bound. It is about the size and weight of a paperback book. This holds all of our first grade curriculum – which used to be housed in three binders that I dreaded taking out!
In this tutorial I’m printing Brave Writer’s Jot it Down curriculum for our first grade writing program. The 80 page manual fits easily on 20 half size pages printed back to back. I’m excited to get into this program, and this size booklet will be easy for me to read through on the couch or in bed! Download a sample of Brave Writer’s curriculum and explore the Brave Writer philosophy here.
Reasons to print your own curriculum
Save Money
If you are deciding between ordering pre-printed curriculum and printing your own, the savings is huge! Between the costs of printing, binding, and shipping, you could be saving $20+++ on each purchase. Plus, pdf guides can be re-printed for little siblings instead of reordered!
Printing services charge by the page and for the binding. Printing starts around $0.35 per page for color copies printed and punched. Printing at home is much more cost effective – especially when you’re printing out 400+ pages for multiple children!
Save Time
I’m a paper and pen person. Last year I spent a lot of time transferring my curriculum into lesson plans. With printed curriculum on hand, however, I can easily reference plans and make notes without recopying everything, scrolling through files, or taking time away from the homeschool day to reference something on my laptop. My entire goal this year is to avoid homeschool burnout. Having what I need on-hand is a big step forward!
You will also be able to customize your curriculum booklet or binder on demand. No waiting for material to be delivered or hanging around Staples with toddlers in tow. Printing, punching, and adding my pages took me about a half hour. It takes me longer to get the kids dressed and in the car.
Save Space
Printing full-size copies in binders or owning a huge TE for each subject and level takes up a LOT of room! Follow the steps below to create booklets that are half the size and use a quarter of the paper. Small, handy books that are portable and durable.
Print curriculum half size and back to back
This tutorial is useful for printers that print double-sided. If you’re printer only prints single-sides you can (1) choose to print only on the front of the pages, see below* or (2) follow the computer’s prompts to reinsert pages.
Watch the video below or click here to watch on YouTube.
Step-by-step tutorial below.

Materials
Your digital curriculum PDFs
Paper
Printer
Paper cutter or scissors
For disc bound booklets
For binder*
Mini binder and mini 3 hold punch -or-
Any A5 binder with coordinating punch
*I chose discs because of the large capacity – 1 inch discs hold the same as a 1 inch binder. Mini or A5 Binders hold much less.
Optional
A5 size dividers, dashboards, or covers to finish your booklet
Large paperclips, binder clips, or book marks to mark your spot
Directions
Open your PDF in Adobe Reader
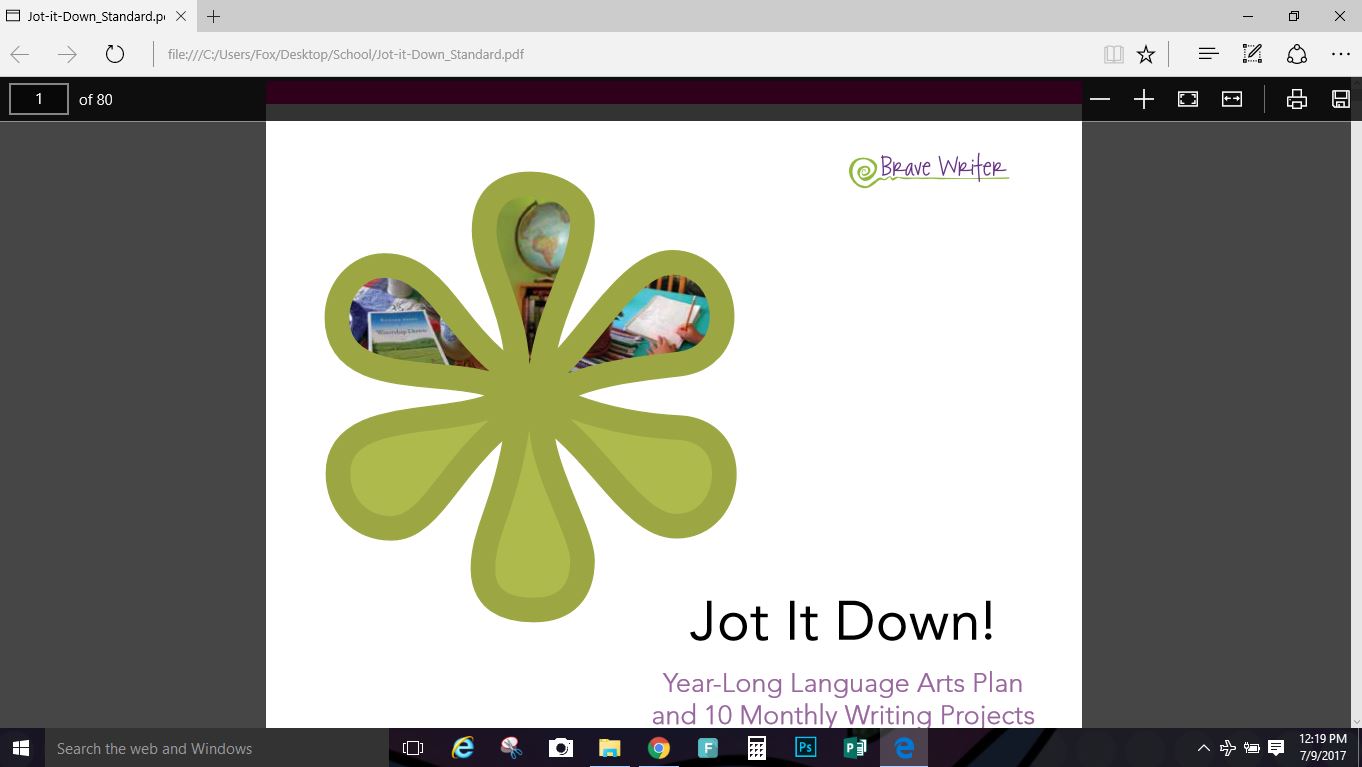
Click the print icon to open the printing dialogue box.
Choose More Settings.

In the Page layout box select the following:
Duplex printing: Print on two sides (flip on short edge)
Pages per sheet: 2
*For single sided printers, simply select Pages per sheet: 2
Click okay and print.
Important! Don’t forget this step!
Scroll down to Output options
Select Document binding: Booklet
This is the step that makes the pages print in the correct order.
Then click OK.

Choose to print all pages or a certain page range
Keep in mind that right-hand pages are odd. If you are only printing a portion of the PDF, start with an odd page or your first page will be blank.

Click Print
After Printing Your curriculum:
Cut pages in half at the 5-1/2 inch mark.
Order your pages (they will print from the center out when printing a booklet)
Punch the binding side – often the page numbers will be on the opposite edge of the page, but not always in printable curriculum as many are designed to be printed full size.
Bind with 8 discs or insert into binder
I hope this tutorial helps you save some time and money and keeps your curriculum manageable. Have a great homeschool year!
You may also enjoy

Ashley helps parents who want to homeschool find the resources they need to successfully teach their children. Ashley is a former teacher, current homeschooler, published author, and designer behind Circle Time with Miss Fox printables as well as the creator of this website, The Homeschool Resource Room.
2 replies on “Tutorial: Print Curriculum Half Size for a Book or Binder”